Module 3 Lab 2 - Klish (The Management Framework CLI)
As a young IT technician, one of your tasks is to ensure the continuous operation of your network. To achieve this, it is important to back up your switch configurations to prevent data loss and reduce downtime in case of failure.
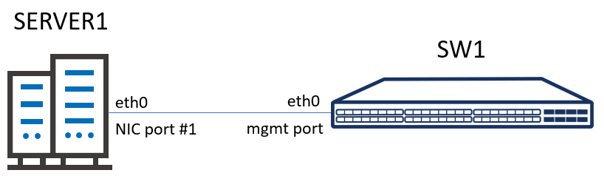
The purpose of the task in question will be to perform a backup on the working switch and transfer it to SERVER1 to secure the configuration. In the event of a failure of switch SW1, the saved backup of the configuration will make it very easy to open it on a new switch.
There is an existing server SERVER1 in your management network with static ip address 192.168.1.200/24.
Step 1 Log to the SW1 using Klish.
Log into the switch and switch to the EXEC mode using Klish.
- Step 2: Configuring a static IP address and bringing up the interface:
Configure the IP address of the eth0 interface and bring it up of the SW1 switch with correct address sub.
Verify the configuration. Execute a ping command to the server to validate the connection.
- Step 3: Backup configuration and send it to the SERVER1
Make a backup of the SW1 configuration. Upload a copy of the configuration to the server.
- Step 4: Check on the SERVER1 if you see saved configuration from SW1.
Log on the SERVER1, check if there is a configuration file from SW1 on the SERVER1
- The switch starts automatically into SONiC NOS.
- Default authentication is login: admin passwords: YourPaSsWoRd
- The netmask is represented as a prefix after the IP address in SONiC NOS.
To set the netmask to 255.255.255.0, use the prefix 24. For example, 192.168.1.10/24.
The purpose of this lab is to practice the manual method of configuring a network switch with SONiC.
Backup configuration and send it to the SERVER1.
Below you will find an example of this lab.
Step 1: Log to the SW1 using Klish and start configuration mode.
1. sonic login: admin
2. Password:
3. Last login: Fri Apr 14 09:20:01 UTC 2023 on ttyS0
4. Linux sonic 4.19.0–9–2–amd64 #1 SMP Debian 4.19.118-2+deb10u1 (2020-06-07) x86_64
5. You are on
6. ____ ___ _ _ _ ____
7. / ___| / _ \| \ | (_)/ ___|
8. \___ \| | | | \| | | |
9. ___) | |_| | |\ | | |___
10. |____/ \___/|_| \_|_|\____|
11.
12. — Software for Open Networking in the Cloud —
13.
14. Unauthorized access and/or use are prohibited.
15. All access and/or use are subject to monitoring.
16.
17. Help: http://azure.github.io/SONiC/
18.
19. admin@r2o–sw1:~$ sonic–cli
20. r2o–sw1# configure terminal
Step 2: Configuration of a static IP address and activation of the interface:
1. r2o–sw1(config)# interface Management 0
2. r2o–sw1(conf–if–Ethernet0)# ip address 192.168.1.10/24 // IP address configuration
3. r2o–sw1(conf–if–Ethernet0)# no shutdown // setting port activation
4. r2o–sw1(conf–if–Ethernet0)# exit
Verify the IP address configuration on port eth0 on switch SW1
1. r2o–sw1(conf–if–eth0)# show configuration
2. !
3. interface Management 0
4. description Management0
5. mtu 1500
6. autoneg on
7. speed 1000
8. ip address 192.168.1.10/24
9. sonic(conf–if–eth0)#
You can also use show interfaces management 0 command to display information about the IP configuration of network interfaces, including the IP addresses assigned to them, their status, and other relevant details.
1. r2o–sw1# show interface Management 0
2. eth0 is up, line protocol is up
3. Hardware is MGMT, address is 0c:f8:92:bc:00:00
4. Description: Management0
5. IPV4 address is 192.168.1.10/24
6. Mode of IPV4 address assignment: MANUAL
7. IPV6 address is fe80::ef8:92ff:febc:0/64
8. Mode of IPV6 address assignment: DHCP
9. IP MTU 1500 bytes
10. LineSpeed 1GB, Auto–negotiation True
11. Input statistics:
12. 158 packets, 9480 octets
13. 0 Multicasts, 0 error, 0 discarded
14. Output statistics:
15. 62 packets, 14328 octets
16. 0 error, 0 discarded
17. Time since last interface status change: 00:16:36
Execute a ping command to the server to validate the connection.
1. r2o–sw1# ping 192.168.1.200
2. PING 192.168.1.200 (192.168.0.200) 56(84) bytes of data.
3. 64 bytes from 192.168.1.200: icmp_seq=1 ttl=64 time=1.65 ms
4. 64 bytes from 192.168.1.200: icmp_seq=2 ttl=64 time=0.928 ms
Step 3: Backup configuration and send it to SERVER1.
Make a backup of the SW1 configuration by using the command below.
1. admin@r2o–sw1:~$ sudo cp /etc/sonic/config_db.json /etc/sonic/config_db.json.backup
Ping
Check if the config_db.json.backup was saved successfully.
1. admin@r2o–sw1:~$ cd /etc/sonic/
2. admin@r2o–sw1:/etc/sonic$ ls –l | grep config_db.json
3. –rw——- 1 root root 28163 Apr 27 10:21 config_db.json
4. –rw——- 1 root root 28163 Apr 27 12:37 config_db.json.backup
5. admin@r2o–sw1:/etc/sonic$
We will use the SCP (secure copy) protocol for copying the configuration to the server. SCP allows files to be transferred securely between a local and remote host or between two remote hosts. It uses the same authentication and security as the Secure Shell Protocol (SSH) on which it is based. SCP is loved for its simplicity, security and pre-installed availability.
Upload a copy of the configuration to the server by using the command below.
1. admin@r2o–sw1:~$ sudo scp config_db.json.backup stordis@192.168.1.200:/home/stordis
Step 4: Check on the SERVER1 if you see saved configuration from SW1.
Log on the SERVER1, check if there is a configuration file from SW1 on the SERVER1
1. stordis@stordis:~$ ls –l
3. –rw——- 1 stordis stordis 28163 kwi 27 12:43 config_db.json.backup
To compare the saved configuration backup on SW1, use the Klish command: show running-configuration to display the currently active configuration. On the SERVER1 use the cat command with file name.
SW1
1. admin@r2o–sw1:~$ sonic–cli
2. r2o–sw1# show running-configuration
SERVER1
1. stordis@stordis:~$ cat config_db.json.backup